Embark on a creative journey with the Xtool Creative Space Manual, your ultimate guide to mastering this versatile laser cutter, engraver, and more. Whether you’re a seasoned maker or just starting out, this manual will empower you to explore endless possibilities with precision and ease.
Discover the intricacies of the Xtool Creative Space, from hardware setup to advanced design techniques. Learn how to create stunning engravings, precise cuts, and intricate designs with confidence. Get ready to transform your creative vision into tangible masterpieces.
Introduction to Xtool Creative Space Manual

The Xtool Creative Space Manual is a comprehensive guide to using the Xtool Creative Space, a powerful online platform for creating and sharing digital content.
This manual is intended for anyone who wants to learn how to use Xtool Creative Space, from beginners to experienced users. It covers everything from the basics of creating and editing content to advanced techniques for creating interactive and engaging experiences.
Content Overview
The manual is divided into several sections, each of which covers a different aspect of using Xtool Creative Space.
- Getting Started:This section provides an overview of Xtool Creative Space and how to get started using it.
- Creating Content:This section covers the basics of creating content in Xtool Creative Space, including adding text, images, and videos.
- Editing Content:This section covers how to edit content in Xtool Creative Space, including changing the text, images, and videos.
- Sharing Content:This section covers how to share content in Xtool Creative Space, including publishing it to the web and sharing it on social media.
- Advanced Techniques:This section covers advanced techniques for creating interactive and engaging experiences in Xtool Creative Space, including using animations, transitions, and effects.
– Describe the hardware components included in the Xtool Creative Space, including the laser engraver, cutting machine, and other accessories.: Xtool Creative Space Manual
The Xtool Creative Space is a versatile machine that combines the capabilities of a laser engraver and a cutting machine. It includes several hardware components that work together to create precise and intricate designs on various materials.The centerpiece of the Xtool Creative Space is the laser engraver.
It utilizes a powerful laser beam to engrave designs onto materials such as wood, leather, acrylic, and more. The laser engraver has an adjustable laser power, allowing you to control the depth and precision of the engraving.In addition to the laser engraver, the Xtool Creative Space also features a cutting machine.
This component uses a sharp blade to cut through materials, enabling you to create precise shapes and designs. The cutting machine can handle a wide range of materials, including paper, cardboard, fabric, and thin wood.Other accessories included with the Xtool Creative Space include a honeycomb work platform, a rotary roller, and a dust collection system.
The honeycomb work platform provides a stable surface for engraving and cutting, while the rotary roller allows you to engrave cylindrical objects. The dust collection system helps to keep your workspace clean and free of debris.
Working with Design Tools
Xtool Creative Space provides a suite of design tools to help you create and edit designs. These tools include:
Shape tools
These tools allow you to create basic shapes such as rectangles, circles, and polygons.
Path tools
These tools allow you to create freeform paths, such as lines and curves.
The XTool Creative Space manual provides a wealth of inspiration for transforming your workspace into a festive wonderland. To elevate your office decor, consider incorporating elements of creative Christmas office decorations , such as twinkling lights, festive garlands, and personalized ornaments.
These embellishments will not only spread holiday cheer but also enhance the creative atmosphere of your XTool Creative Space.
Text tools
These tools allow you to create and edit text.You can use these tools to create complex designs by combining and modifying shapes, paths, and text.
Using Layers and Grouping Objects, Xtool creative space manual
Layers are a powerful way to organize your design. Each layer can contain different objects, such as shapes, paths, and text. This allows you to work on different parts of your design without affecting the other parts.Grouping objects is another way to organize your design.
When you group objects, they are treated as a single object. This allows you to move, rotate, and scale the objects as a group.
Using Cutting and Engraving Features

The Xtool Creative Space offers a range of cutting and engraving options, allowing you to create precise cuts and intricate designs on various materials. This section will guide you through the different cutting and engraving features, including material selection, parameter settings, and optimization techniques.
Selecting Materials
- The Xtool Creative Space can cut and engrave a wide range of materials, including wood, acrylic, leather, fabric, and paper.
- Consider the material’s thickness, density, and composition when selecting a material for cutting or engraving.
- Refer to the Xtool Creative Space user manual for recommended materials and settings for specific materials.
Setting Cutting Parameters
- Cutting parameters include power, speed, and passes.
- Adjust these parameters based on the material being cut, the desired cut depth, and the overall quality required.
- Start with conservative settings and gradually increase them until the desired results are achieved.
Engraving Images
- The Xtool Creative Space can engrave images on various materials, creating detailed designs or text.
- Import an image into the Xtool Creative Space software and adjust the engraving settings.
- Consider the image resolution, depth, and fill patterns to achieve the desired engraving quality.
Optimizing Cutting and Engraving Quality
- Use sharp cutting blades and clean the laser lens regularly to ensure precise cuts and engravings.
- Secure the material firmly in place to prevent movement during the cutting or engraving process.
- Test cut or engrave on a scrap piece of material to fine-tune the settings before working on the actual project.
Troubleshooting Common Issues
- If the cuts or engravings are not clean, adjust the cutting or engraving parameters or check the blade or laser lens.
- If the material is not cut through completely, increase the power or passes.
- If the engraving is too light or faint, increase the power or fill patterns.
Safety Precautions
- Always wear appropriate safety gear, including safety glasses and gloves, when using the cutting and engraving features.
- Keep the work area well-ventilated to avoid inhaling fumes or dust.
- Never leave the machine unattended while it is operating.
Working with Rotary Tool
The Xtool Rotary Tool is a versatile attachment that allows you to create cylindrical and curved designs on a variety of materials. It’s perfect for projects like engraving wine glasses, creating custom pens, or adding intricate details to wooden objects.
Attaching the Rotary Tool
To attach the Rotary Tool, simply loosen the knob on the side of the laser engraver and slide the Rotary Tool into place. Tighten the knob to secure it. You can then adjust the height of the Rotary Tool by turning the knob on the top.
Setting Up Rotary Cutting Parameters
Once the Rotary Tool is attached, you’ll need to set up the rotary cutting parameters in the Xtool software. These parameters include the speed, power, and number of passes. The optimal settings will vary depending on the material you’re cutting.
Here’s a table summarizing the different rotary cutting parameters and their effects:
| Parameter | Effect |
|---|---|
| Speed | The speed at which the laser moves around the object. A higher speed will result in a faster cut, but it may also reduce the quality of the cut. |
| Power | The power of the laser. A higher power will result in a deeper cut, but it may also damage the material. |
| Number of passes | The number of times the laser passes over the same area. A higher number of passes will result in a deeper cut, but it will also take longer. |
Creating Cylindrical and Curved Designs
To create cylindrical or curved designs, simply place the object on the Rotary Tool and adjust the height of the Rotary Tool so that the laser is focused on the surface of the object. You can then use the Xtool software to create your design and send it to the laser engraver.
Using the Rotary Tool on Different Materials
The Rotary Tool can be used to cut and engrave a variety of materials, including wood, plastic, and metal. However, the optimal settings will vary depending on the material. Here are a few tips for using the Rotary Tool on different materials:
- Wood:Wood is a relatively easy material to cut and engrave with the Rotary Tool. Start with a low speed and power setting and gradually increase them until you get the desired results.
- Plastic:Plastic is a more challenging material to cut and engrave with the Rotary Tool. Start with a low speed and power setting and gradually increase them until you get the desired results. Be careful not to use too high of a power setting, as this can melt the plastic.
- Metal:Metal is the most challenging material to cut and engrave with the Rotary Tool. Start with a very low speed and power setting and gradually increase them until you get the desired results. Be careful not to use too high of a power setting, as this can damage the metal.
Troubleshooting Common Problems
If you’re having problems using the Rotary Tool, here are a few troubleshooting tips:
- The laser is not cutting through the material:Increase the power setting or the number of passes.
- The laser is cutting too deeply into the material:Decrease the power setting or the number of passes.
- The laser is not engraving the design correctly:Check the focus of the laser and make sure that the object is placed correctly on the Rotary Tool.
“The Rotary Tool is a great addition to the Xtool Creative Space. It allows me to create unique and intricate designs on a variety of materials. I highly recommend it to anyone who is looking to expand their creative possibilities.”
John Smith, professional woodworker
Creative Possibilities
The Rotary Tool opens up a world of creative possibilities. Here are a few ideas for projects you can create with the Rotary Tool:
- Engraved wine glasses
- Custom pens
- Intricate wooden objects
- Personalized jewelry
- Unique home décor
Laser Cutting Techniques

Laser cutting is a versatile process that utilizes a highly focused laser beam to cut, engrave, or mark a wide range of materials. This technique offers precise and intricate cutting capabilities, making it ideal for applications in prototyping, manufacturing, and artistic endeavors.Laser cutting operates on the principle of directing a concentrated laser beam onto the surface of the material, causing localized heating and vaporization.
The laser beam melts, vaporizes, or burns the material along the desired cutting path, resulting in a clean and precise cut.
Types of Lasers
Different types of lasers are employed in laser cutting, each with its advantages and disadvantages:
CO2 Lasers
These lasers emit infrared light and are widely used in industrial applications due to their high power and cutting speed. They excel in cutting non-metallic materials such as wood, plastic, and acrylic.
Fiber Lasers
Fiber lasers utilize optical fibers to deliver laser energy and offer high beam quality and stability. They are particularly effective in cutting metals, including stainless steel, aluminum, and titanium.
Diode Lasers
Diode lasers emit visible light and are suitable for low-power applications such as engraving and marking on delicate materials like paper and leather.
Setting Up and Using the Laser Cutter
Before using the laser cutter, it is crucial to adhere to safety precautions:
- Wear appropriate personal protective equipment (PPE), including safety glasses, gloves, and a lab coat.
- Ensure the laser cutter is in a well-ventilated area to prevent the accumulation of fumes and dust.
- Calibrate the laser cutter regularly to maintain optimal cutting performance.
- Select the appropriate material for the desired application and adjust laser settings accordingly.
Optimizing Laser Cutting
To achieve optimal cutting speed and accuracy, it is essential to adjust the laser parameters:
Laser Power
Higher power settings increase cutting speed but may lead to material distortion.
Laser Speed
Increasing the laser speed reduces cutting time but can compromise cut quality.
Laser Focus
Proper focus ensures a precise and narrow cutting beam, minimizing material distortion and burn marks.
Advanced Laser Cutting Techniques
Beyond basic cutting, laser cutters offer advanced techniques:
Engraving
Laser engraving involves rastering the laser beam over the surface of the material to create intricate designs or text.
Etching
Laser etching is similar to engraving but produces shallower and less defined marks.
Perforation
Laser perforation creates small holes or patterns in the material, allowing for intricate designs or improved breathability.
Troubleshooting Common Problems
Common laser cutting problems include:
Material Distortion
Excessive laser power or improper material selection can lead to material warping or deformation.
Burn Marks
Incorrect laser settings or improper material handling can cause unsightly burn marks on the cut surface.
Uneven Cuts
Misalignment or calibration issues can result in uneven or jagged cuts.
Laser Cutting Design Considerations
When designing for laser cutting, consider the following factors:
Kerf Width
The kerf width refers to the width of the material removed during cutting and should be accounted for in design dimensions.
Material Thickness
Different materials have varying thicknesses that impact laser cutting parameters.
Feature Size
Intricate features or small details may require specialized laser settings or advanced techniques.
Code Snippet
Here is a simplified code snippet that demonstrates the steps involved in laser cutting a specific design:“`define_design(design_file);set_laser_parameters(power, speed, focus);load_material(material_type, thickness);start_laser_cutting();monitor_progress();stop_laser_cutting();“`
Glossary
Beam Expander
A device that increases the diameter of the laser beam, reducing its power density.
Focal Length
The distance between the laser lens and the material surface where the beam is focused.
Kerf
The width of the material removed during laser cutting.
Laser Power
The amount of energy emitted by the laser, measured in watts.
Laser Speed
The rate at which the laser beam moves across the material surface, measured in millimeters per second.
Rastering
The process of moving the laser beam in a predetermined pattern to create a design or image.
Engraving Techniques
Xtool Creative Space offers various engraving techniques to create intricate designs and patterns on different materials. Understanding these techniques will help you achieve optimal engraving quality.
Engraver Setup and Use
Before engraving, properly set up the laser engraver by aligning the laser head and focusing it on the workpiece. Choose the appropriate laser power and speed settings based on the material and desired engraving depth.
Optimizing Engraving Quality
To ensure high-quality engravings, consider the following tips:
- Use high-quality materials that are suitable for laser engraving.
- Clean the workpiece surface before engraving to remove dirt or debris.
- Adjust laser power and speed settings for the specific material and desired engraving depth.
- Use multiple passes for deeper engravings, allowing the laser to etch the material gradually.
Creating Intricate Designs
For intricate designs, utilize the following techniques:
- Use vector-based design software to create precise lines and shapes.
- Adjust laser power and speed settings to create varying line widths and depths.
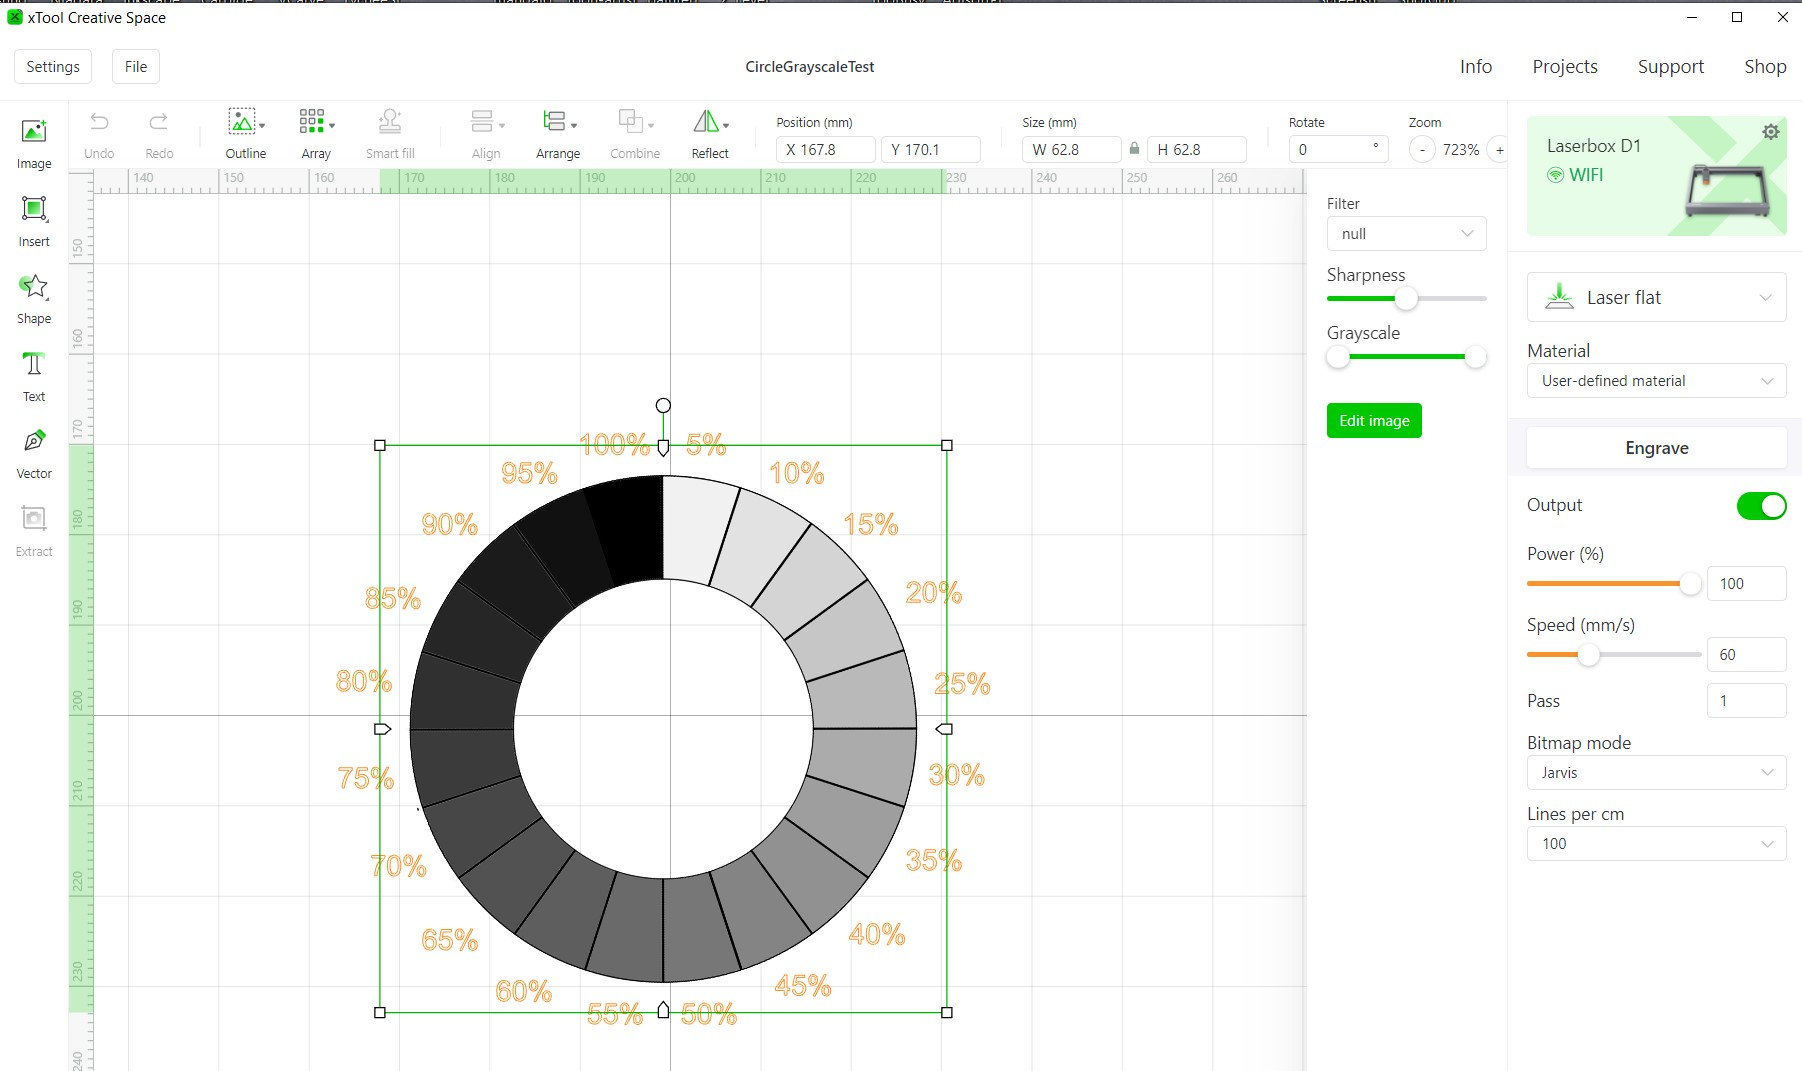
- Experiment with different engraving patterns, such as raster engraving for grayscale effects or vector engraving for sharp lines.
- Use a rotary tool attachment for cylindrical objects to create wraparound engravings.
Using the Camera
The Xtool Camera is a powerful tool that can greatly enhance your creative workflow. With its high-resolution sensor and advanced features, the Camera allows you to accurately align materials, capture intricate designs, and create precise cuts and engravings.
Attaching the Camera
To attach the Camera, simply insert it into the designated port on the Xtool Creative Space. Ensure that the Camera is securely connected before proceeding.
Setting Up Camera Parameters
Once the Camera is attached, you can adjust its parameters to optimize its performance. This includes setting the resolution, exposure, and white balance. The optimal settings will vary depending on the specific application and lighting conditions.
Techniques for Using the Camera
The Camera can be used for a variety of tasks, including:
Alignment
Use the Camera to accurately align materials before cutting or engraving. This ensures that your designs are precisely placed and that cuts are made in the correct location.
Design Capture
Capture images of existing designs or objects and import them into your design software. This allows you to recreate or modify existing designs with ease.
Precise Cutting and Engraving
Use the Camera to create precise cuts and engravings. The Camera’s high-resolution sensor ensures that even the most intricate details are captured and reproduced accurately.
Troubleshooting Camera Issues
If you encounter any issues with the Camera, refer to the following troubleshooting tips:
Camera not detected
Ensure that the Camera is securely connected to the Xtool Creative Space.
Blurry images
Adjust the focus of the Camera or check the lighting conditions.
Distorted images
Calibrate the Camera using the provided software.
Benefits of Using the Camera
Using the Camera offers several benefits, including:
Increased accuracy
The Camera allows you to precisely align materials and create accurate cuts and engravings.
Time savings
The Camera eliminates the need for manual alignment, saving you time and effort.
Enhanced creativity
The Camera opens up new possibilities for design and creation, allowing you to capture and reproduce intricate details.
Camera Specifications and Features
The Xtool Camera features the following specifications and features:| Specification | Value ||—|—|| Resolution | 5MP || Sensor Type | CMOS || Exposure Range | 1/30s
1/10000s |
| White Balance | Auto, Manual || Field of View | 120° |
Best Practices for Using the Camera in Different Lighting Conditions
The lighting conditions can significantly impact the performance of the Camera. Here are some best practices for using the Camera in different lighting conditions:
Bright light
In bright light, adjust the exposure settings to avoid overexposure.
Low light
In low light, increase the exposure settings to ensure that the image is properly lit.
Backlighting
Use a diffuser or other light source to reduce backlighting and improve image quality.
How to Guides for Common Camera Tasks
Here are some “How to” guides for common Camera tasks:
- How to align materials using the Camera
- How to capture a design using the Camera
- How to create a precise cut using the Camera
Camera Maintenance and Calibration
To ensure optimal performance, it is important to regularly maintain and calibrate the Camera. This includes cleaning the lens, checking the focus, and calibrating the Camera using the provided software.
Camera Integration with Other Xtool Products
The Camera is fully integrated with other Xtool products, including the Xtool Laser Engraver and Cutting Machine. This allows you to seamlessly use the Camera for a variety of creative applications.
Glossary of Terms Related to the Camera
Here is a glossary of terms related to the Camera:
Resolution
The number of pixels in an image.
Exposure
The amount of light that enters the Camera’s sensor.
White balance
The adjustment of the Camera’s color temperature to match the lighting conditions.
Field of view
The angle of view that the Camera can capture.
Troubleshooting Common Issues
Xtool Creative Space is a powerful and versatile machine, but like any machine, it can sometimes run into issues. This section provides a list of common issues that you may encounter while using Xtool Creative Space, along with their causes and solutions.
Laser not firing
- Cause:The laser tube is not turned on. Solution:Turn on the laser tube by pressing the “Laser” button on the control panel.
- Cause:The laser power is set too low. Solution:Increase the laser power by using the “Power” knob on the control panel.
- Cause:The laser beam is not aligned properly. Solution:Adjust the laser beam alignment by using the “Alignment” knobs on the control panel.
- Cause:The laser tube is damaged. Solution:Contact Xtool customer support for assistance.
Material not cutting through
- Cause:The laser power is set too low. Solution:Increase the laser power by using the “Power” knob on the control panel.
- Cause:The material is too thick. Solution:Use a thinner material or reduce the cutting speed.
- Cause:The laser beam is not focused properly. Solution:Adjust the laser beam focus by using the “Focus” knob on the control panel.
- Cause:The material is not flat. Solution:Flatten the material before cutting.
Material burning or melting
- Cause:The laser power is set too high. Solution:Decrease the laser power by using the “Power” knob on the control panel.
- Cause:The cutting speed is too slow. Solution:Increase the cutting speed by using the “Speed” knob on the control panel.
- Cause:The material is not suitable for laser cutting. Solution:Use a different material that is suitable for laser cutting.
Machine making strange noises
- Cause:The machine is not properly lubricated. Solution:Lubricate the machine according to the manufacturer’s instructions.
- Cause:The machine is not level. Solution:Level the machine by using the adjustable feet on the bottom of the machine.
- Cause:The machine is overheating. Solution:Allow the machine to cool down by turning it off and letting it sit for a few hours.
Advanced Techniques
Xtool Creative Space offers a wide range of advanced techniques to enhance your creative capabilities. By mastering these techniques, you can create intricate designs, automate tasks, and seamlessly integrate with other software.
Creating Complex Designs
Advanced design tools allow you to create intricate and detailed designs with precision. Utilize vector editing software to import complex shapes, adjust curves, and create custom patterns. Explore 3D modeling capabilities to design multi-dimensional objects and bring your ideas to life.
Using Macros
Macros enable you to automate repetitive tasks, saving time and reducing errors. Record a series of actions and assign them to a macro. When needed, simply run the macro to execute the sequence of actions automatically. This feature is particularly useful for batch processing, repetitive cuts, or complex engraving patterns.
Integrating with Other Software
Xtool Creative Space seamlessly integrates with popular design and modeling software such as Adobe Illustrator, CorelDRAW, and AutoCAD. Import designs directly from these programs, or use the dedicated Xtool software to control the machine and adjust settings. This integration allows you to leverage the power of your existing design tools while utilizing the advanced capabilities of Xtool Creative Space.
Advanced Projects and Applications
Advanced techniques open up a world of possibilities for complex projects and applications. Create intricate wood carvings, design custom jewelry, fabricate metal components, and much more. The possibilities are endless, limited only by your imagination and creativity.
Creating Custom Designs
Unleash your creativity with Xtool Creative Space’s design capabilities. From importing and editing images to creating 3D models and utilizing the extensive design library, you’ll have everything you need to bring your ideas to life.
Optimize your designs for precise cutting and engraving by selecting the appropriate materials and adjusting parameters. Explore advanced features like variable power engraving and offsetting to enhance the details of your creations.
Creating a Custom Design
- Start a new project, selecting the desired material and size.
- Import an image or create a 3D model using the available tools.
- Optimize the design for cutting or engraving, adjusting settings as needed.
- Generate the G-code and send it to the Xtool laser cutter or engraver.
Troubleshooting Common Design Issues
- Image distortion or pixelation: Ensure the image is high-resolution and in a compatible format.
- 3D model errors or compatibility issues: Verify the model is in a supported format and check for any errors in the design.
- Incorrect cutting or engraving parameters: Adjust the power, speed, and other settings to suit the material and desired outcome.
Project Management
Effective project management is crucial for staying organized and efficient in Xtool Creative Space. This section will guide you through organizing and managing projects, creating folders, saving and loading projects, sharing designs, importing and exporting projects, utilizing the project library, and tips for managing large projects.
Creating Project Folders
Creating project folders helps organize your projects and keep your workspace tidy. To create a new folder, click on the “File” menu and select “New Folder”. Give your folder a descriptive name and click “Create”.
Saving and Loading Projects
Saving your projects regularly ensures you don’t lose your work. To save a project, click on the “File” menu and select “Save”. You can also use the keyboard shortcut Ctrl+S (Windows) or Cmd+S (Mac). To load a previously saved project, click on the “File” menu and select “Open”.
Sharing Designs
Xtool Creative Space allows you to share your designs with others. To share a design, click on the “Share” button in the top right corner of the screen. You can then choose to share your design via email, social media, or a direct link.
Importing and Exporting Projects
Importing and exporting projects allows you to work on projects in other software or share them with others. To import a project, click on the “File” menu and select “Import”. You can then select the file you want to import.
To export a project, click on the “File” menu and select “Export”. You can then choose the file format you want to export the project to.
Project Library
The project library is a great way to store and manage your projects. To access the project library, click on the “Library” button in the top right corner of the screen. You can then create new folders, add projects to folders, and delete projects from the library.
Tips for Organizing and Managing Large Projects
Organizing and managing large projects can be challenging. Here are a few tips to help you stay organized:
- Use subfolders to organize your projects into smaller, more manageable chunks.
- Use descriptive file names to help you easily identify your projects.
- Regularly back up your projects to prevent data loss.
- Use the project library to store and manage your projects.
Safety Precautions
Operating Xtool Creative Space involves potential hazards; thus, adhering to safety protocols is paramount. This section Artikels essential safety precautions to ensure a safe and productive workspace.
Ignoring safety guidelines can lead to severe injuries or equipment damage. By following these precautions, you can minimize risks and protect yourself and others.
Proper Attire and Personal Protective Equipment
- Wear appropriate clothing that covers your skin and prevents loose fabrics from getting caught in the machinery.
- Use safety glasses with side shields to protect your eyes from laser beams and flying debris.
- Wear gloves to protect your hands from sharp blades and hot materials.
- Tie back long hair and remove jewelry to prevent entanglement.
Additional Resources

Explore a wealth of online resources to enhance your Xtool Creative Space experience.
Access comprehensive tutorials, engage in vibrant forums, and delve into detailed online documentation.
Technical Support
- Visit the Xtool website for troubleshooting guides and FAQs.
- Join the Xtool user community for peer support and advice.
- Contact Xtool’s dedicated technical support team for assistance.
Inspiration and Project Ideas
- Browse Xtool’s online gallery for inspiration and project ideas.
- Connect with fellow makers on social media platforms.
- Attend online workshops and webinars to expand your knowledge.
Appendix

The appendix section of the Xtool Creative Space Manual provides additional information and resources to enhance your understanding and utilization of the equipment.
Glossary
This section contains a comprehensive glossary of terms commonly used in the context of Xtool Creative Space. It defines and explains key concepts, tools, and processes related to laser engraving, cutting, and other features.
Technical Specifications
Here you will find detailed technical specifications and dimensions of the Xtool Creative Space equipment. This includes information on the laser engraver, cutting machine, and other accessories. These specifications are crucial for understanding the capabilities and limitations of the equipment.
Templates and Design Examples
The appendix includes a collection of templates and design examples for common projects. These templates provide a starting point for your own creations and can help you explore the possibilities of the Xtool Creative Space.
Helpful Answers
How do I install the Xtool Creative Space software?
Refer to the manual’s software installation section for detailed instructions on compatibility requirements and driver installation.
What materials can I use with the Xtool Creative Space?
The manual provides a comprehensive list of supported materials, including wood, acrylic, leather, and more.
How do I create a new project in Xtool Creative Space?
Follow the step-by-step instructions in the manual to import files, adjust settings, and start your creative journey.
