Mac os uninstall creative cloud – Uninstalling Creative Cloud from Mac OS can be a daunting task, but with the right guidance, it can be done swiftly and efficiently. This guide will provide a comprehensive overview of the uninstallation process, including detailed instructions, troubleshooting tips, and best practices.
Whether you’re experiencing technical difficulties or simply want to remove Creative Cloud from your Mac, this guide has got you covered.
Uninstall Creative Cloud from Mac OS

Creative Cloud is a suite of applications and services from Adobe. If you no longer need Creative Cloud, you can uninstall it from your Mac OS computer. Here’s how:
Step 1: Quit Creative Cloud applications
Before you begin the uninstallation process, make sure to quit all Creative Cloud applications. This includes any Adobe applications that are running in the background.
Step 2: Uninstall Creative Cloud
- Open the Applications folder on your Mac.
- Find the Creative Cloud Uninstaller application.
- Double-click on the Creative Cloud Uninstaller application.
- Follow the on-screen prompts to uninstall Creative Cloud.
Step 3: Remove related files and folders
Once Creative Cloud has been uninstalled, you can remove the related files and folders. This includes the following:* The Creative Cloud folder in your Applications folder
- The Adobe Creative Cloud folder in your Library folder
- Any other Adobe-related files and folders that you can find on your computer
Step 4: Troubleshooting
If you encounter any problems during the uninstallation process, you can try the following:* Restart your computer.
- Run the Creative Cloud Cleaner tool.
- Contact Adobe support.
Step 5: Reinstall Creative Cloud
If you need to reinstall Creative Cloud, you can download the installer from the Adobe website.
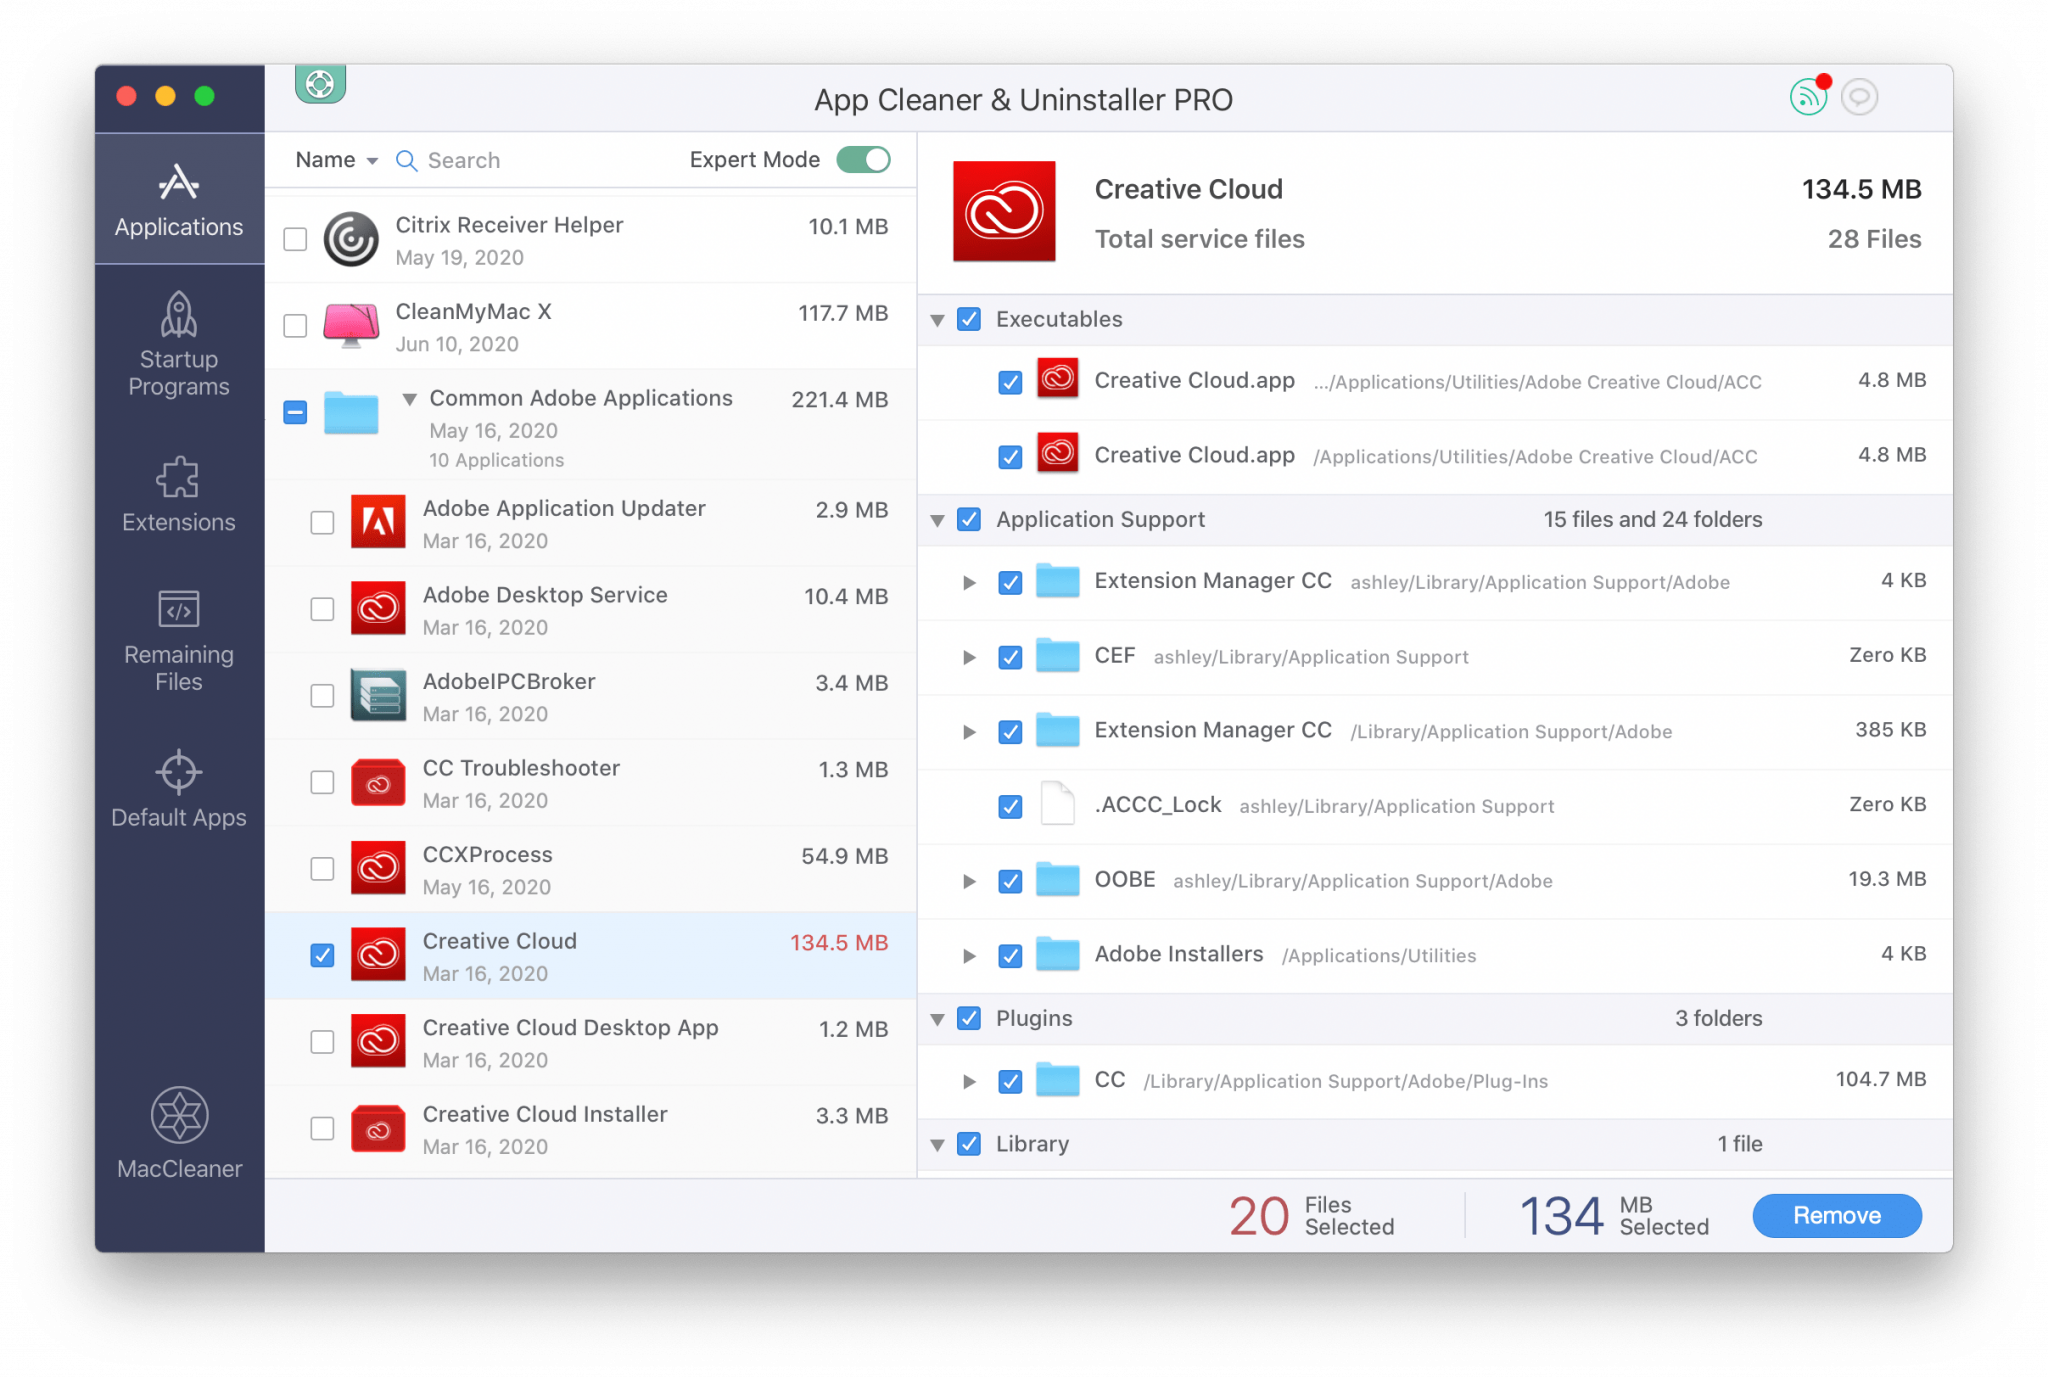
Remove Creative Cloud Files and Folders
.png "Uninstall")
Uninstalling Creative Cloud removes the application and its associated preferences, but some files and folders may remain on your Mac OS computer. To ensure a complete uninstallation, you should manually delete these remaining files and folders.
Identifying Creative Cloud Files and Folders
Creative Cloud files and folders are typically located in the following directories:
- /Applications/Adobe Creative Cloud
- /Library/Application Support/Adobe
- /Library/Preferences/Adobe
- /Library/Caches/Adobe
Deleting Files and Folders Manually, Mac os uninstall creative cloud
To manually delete Creative Cloud files and folders, follow these steps:
- Open Finder and navigate to the directories listed above.
- Select the Creative Cloud files and folders and drag them to the Trash.
- Empty the Trash to permanently delete the files and folders.
Using Terminal to Remove Hidden Files and Folders
Some Creative Cloud files and folders may be hidden. To remove these hidden files and folders, you can use the Terminal.
- Open Terminal (Applications > Utilities > Terminal).
- Enter the following command:
- name “Adobe”
- print | xargs rm
- rf
- Press Enter.
find ~/Library
Potential Impact of Deleting Files and Folders
Deleting Creative Cloud files and folders will not affect other applications or user data. However, if you have any unsaved projects or files open in Creative Cloud applications, they will be lost when you delete the files and folders.
Troubleshooting Errors
If you encounter any errors while deleting Creative Cloud files and folders, try the following:
- Make sure you have administrator privileges.
- Restart your Mac OS computer.
- Contact Adobe Customer Support for assistance.
Clean Up Registry Entries
After uninstalling Creative Cloud from your Mac, it’s important to clean up any remaining registry entries associated with the software. These entries can take up space on your hard drive and potentially cause conflicts with other software. There are two main ways to clean up registry entries: using third-party software or manually deleting them.
Using Third-Party Software
There are several third-party software programs that can be used to clean up registry entries. These programs typically scan your registry for invalid or orphaned entries and allow you to delete them. Some popular registry cleaners include CCleaner, Registry Mechanic, and Wise Registry Cleaner.
Manually Deleting Registry Entries
You can also manually delete registry entries using the Registry Editor. However, this is a more advanced task and should only be attempted by experienced users. To manually delete registry entries, follow these steps:
- Open the Registry Editor by pressing Windows Key + R and typing “regedit”.
- Navigate to the following registry key: HKEY_CURRENT_USER\Software\Adobe
- Delete the “Creative Cloud” key.
- Navigate to the following registry key: HKEY_LOCAL_MACHINE\SOFTWARE\Adobe
- Delete the “Creative Cloud” key.
Note:
Be sure to back up your registry before making any changes. If you are not comfortable manually deleting registry entries, it is best to use a third-party software program.
Sample Script
The following script can be used to automate the registry cleanup process:
reg delete "HKEY_CURRENT_USER\Software\Adobe\Creative Cloud" /freg delete "HKEY_LOCAL_MACHINE\SOFTWARE\Adobe\Creative Cloud" /f
To run the script, open a command prompt and type the following command:
regedit /s script.reg
Uninstall Creative Cloud Applications: Mac Os Uninstall Creative Cloud

Before uninstalling any Creative Cloud applications, it is important to back up any important files or projects. Once an application is uninstalled, its files and settings will be removed from your computer.
To uninstall a Creative Cloud application, you can use the Applications folder or Launchpad. To use the Applications folder, open it and drag the application you want to uninstall to the Trash. To use Launchpad, open it and click and hold on the application you want to uninstall until it starts to jiggle.
Then, click on the “X” that appears in the corner of the application’s icon and click on “Delete” to confirm.
| Application | Uninstallation Process |
|---|---|
| Adobe Acrobat Reader | Drag the application to the Trash or use Launchpad to uninstall. |
| Adobe After Effects | Drag the application to the Trash or use Launchpad to uninstall. |
| Adobe Animate | Drag the application to the Trash or use Launchpad to uninstall. |
| Adobe Audition | Drag the application to the Trash or use Launchpad to uninstall. |
| Adobe Bridge | Drag the application to the Trash or use Launchpad to uninstall. |
| Adobe Character Animator | Drag the application to the Trash or use Launchpad to uninstall. |
| Adobe Dreamweaver | Drag the application to the Trash or use Launchpad to uninstall. |
| Adobe Fresco | Drag the application to the Trash or use Launchpad to uninstall. |
| Adobe Illustrator | Drag the application to the Trash or use Launchpad to uninstall. |
| Adobe InCopy | Drag the application to the Trash or use Launchpad to uninstall. |
| Adobe InDesign | Drag the application to the Trash or use Launchpad to uninstall. |
| Adobe Lightroom Classic | Drag the application to the Trash or use Launchpad to uninstall. |
| Adobe Media Encoder | Drag the application to the Trash or use Launchpad to uninstall. |
| Adobe Muse | Drag the application to the Trash or use Launchpad to uninstall. |
| Adobe Photoshop | Drag the application to the Trash or use Launchpad to uninstall. |
| Adobe Premiere Pro | Drag the application to the Trash or use Launchpad to uninstall. |
| Adobe Rush | Drag the application to the Trash or use Launchpad to uninstall. |
| Adobe Spark | Drag the application to the Trash or use Launchpad to uninstall. |
| Adobe XD | Drag the application to the Trash or use Launchpad to uninstall. |
You can also use a script to automate the uninstallation process for all Creative Cloud applications. To do this, open the Terminal application and enter the following command:
sudo rm
-rf /Applications/Adobe\ Creative\ Cloud.app /Library/Application\ Support/Adobe /Library/Preferences/Adobe
Enter your password when prompted and press Enter. This command will remove the Creative Cloud application, its support files, and its preferences from your computer.
If you encounter any problems uninstalling a Creative Cloud application, you can try the following troubleshooting tips:
- Make sure that you have administrator privileges on your computer.
- Quit all Creative Cloud applications before uninstalling.
- Restart your computer after uninstalling.
Remove Creative Cloud Preferences

To complete the uninstallation of Creative Cloud on a Mac OS computer, it is important to remove its preferences. These preferences contain user-specific settings and data, and deleting them ensures a clean uninstallation and prevents potential issues in the future.
Creative Cloud preferences are stored in the following location on a Mac OS computer:
- /Users/[user name]/Library/Preferences/Adobe
To manually delete these preferences, follow these steps:
- Open the Finder and navigate to the Preferences folder located in the Library folder.
- Locate the Adobe folder and move it to the Trash.
- Empty the Trash to permanently delete the preferences.
It is important to note that deleting the Creative Cloud preferences will remove all user-specific settings and data, including:
- Application preferences
- Plug-in settings
- Color swatches
- Keyboard shortcuts
If you wish to preserve any of these settings, it is recommended to back them up before deleting the preferences.
Reset Creative Cloud Settings

Resetting Creative Cloud settings can resolve various issues and restore the application to its default values. This process removes all customized preferences and configurations, providing a clean slate to troubleshoot problems or start fresh.
There are two main methods to reset Creative Cloud settings: using the Creative Cloud Cleaner Tool or performing a manual reset.
Creative Cloud Cleaner Tool
- Download the Creative Cloud Cleaner Tool from Adobe’s website.
- Run the tool and select the “Reset Creative Cloud Settings” option.
- Follow the on-screen instructions to complete the reset process.
Manual Reset
- Close all Creative Cloud applications.
- Navigate to the following folder:
- macOS: ~/Library/Preferences/Adobe Creative Cloud
- Windows: %appdata%\Adobe\Creative Cloud
- Delete the following files and folders:
- com.adobe.csxs.db
- com.adobe.csxs.preference
- com.adobe.creativecloud.config.xml
- Creative Cloud Files folder
Benefits of Resetting Settings:
- Resolves issues caused by corrupted or conflicting settings.
- Provides a clean slate for troubleshooting and debugging.
- Restores default values, ensuring optimal performance.
Potential Risks:
If you’re a Mac OS user looking to uninstall Creative Cloud, head to Applications, select the Creative Cloud Uninstaller, and follow the prompts. Creative directors in NYC earn competitive salaries, as you can see in this informative article on creative director salary nyc.
Returning to our topic, once the Creative Cloud Uninstaller finishes, restart your Mac to complete the uninstallation process.
- Loss of customized preferences and configurations.
- May require re-installation of some Creative Cloud applications.
Reinstall Creative Cloud

Reinstalling Creative Cloud on a Mac OS computer involves downloading the latest version of the software and following the installation instructions. Potential issues or errors during the reinstallation process can include compatibility issues, incomplete uninstallation, or system conflicts.
Download and Install Creative Cloud
To download and install the latest version of Creative Cloud, visit the Adobe website and select the appropriate version for your operating system. Once the download is complete, open the installer package and follow the on-screen instructions.
Troubleshooting Uninstall Issues

Uninstalling Creative Cloud from Mac OS can generally be straightforward, but there may be instances where you encounter issues. Here are some common problems and their potential solutions to help you troubleshoot and resolve any difficulties you may face during the uninstallation process.
Common Uninstall Issues and Troubleshooting Tips
The following table provides a summary of common issues, their causes, and potential solutions for uninstalling Creative Cloud on Mac OS:
| Issue | Cause | Solution |
|---|---|---|
| Applications cannot be uninstalled | Running applications | Quit all Creative Cloud applications before uninstalling. |
| Files cannot be deleted | Files are locked or in use | Close all programs and restart your Mac to unlock the files. |
| Registry entries cannot be removed | Permissions issue | Use an administrator account to uninstall Creative Cloud. |
| Uninstallation fails with an error message | Incomplete uninstallation | Follow the steps in the “Resolving Specific Error Messages” section below. |
Important Troubleshooting Tip:Before uninstalling Creative Cloud, ensure you have backed up your important files and settings to avoid any potential data loss.
Resolving Specific Error Messages
If you encounter an error message during the uninstallation process, here are some steps you can take to resolve it:
- Identify the error message and search for it in the Adobe Support database or online forums.
- Follow the recommended troubleshooting steps provided by Adobe or other reliable sources.
- If the issue persists, contact Adobe Support for further assistance.
Additional Resources
In addition to the troubleshooting tips provided here, you may find the following resources helpful:
- Adobe Help Center: Uninstall Creative Cloud desktop app
- Adobe Support Community: Creative Cloud Desktop
Alternative Uninstall Methods

In addition to the methods described above, there are several alternative ways to uninstall Creative Cloud on Mac OS.
Third-Party Software
There are several third-party software programs that can help you uninstall Creative Cloud. These programs can often remove all traces of the software, including preferences and files that may have been left behind by the standard uninstall process.
Some popular third-party uninstallers include:
- AppCleaner
- CleanMyMac X
- Uninstall Tool
These programs are relatively easy to use. Simply download and install the program, then run it and select Creative Cloud from the list of installed applications. The program will then remove all traces of the software from your computer.
Command-Line Tools
You can also use command-line tools to uninstall Creative Cloud. This method is more advanced, but it can be more effective than using a third-party uninstaller.
To uninstall Creative Cloud using the command line, open a Terminal window and enter the following command:
sudo rm
rf /Applications/Adobe\ Creative\ Cloud.app
This command will remove the Creative Cloud application from your computer. You may also need to remove other files and folders associated with Creative Cloud. To do this, enter the following commands:
sudo rm
rf ~/Library/Application\ Support/Adobe/Creative\ Cloud
sudo rm
rf ~/Library/Preferences/Adobe/Creative\ Cloud
These commands will remove all traces of Creative Cloud from your computer.
Comparison of Uninstall Methods
The best uninstall method for you will depend on your specific needs. If you want a quick and easy way to uninstall Creative Cloud, then a third-party uninstaller is a good option. If you need to remove all traces of the software, then using the command line is a more effective option.
| Method | Ease of Use | Effectiveness |
|---|---|---|
| Standard Uninstall | Easy | Good |
| Third-Party Uninstaller | Easy | Very Good |
| Command-Line Tools | Difficult | Excellent |
Automate the Uninstall Process

Automating the uninstallation process of Creative Cloud on Mac OS using scripts or batch files can streamline the task, save time, and reduce the risk of errors.
Benefits of Automating the Uninstall Process
- Efficiency:Automating the process eliminates the need for manual intervention, saving time and effort.
- Accuracy:Scripts or batch files can execute commands precisely, reducing the likelihood of errors or incomplete uninstallation.
- Consistency:Automated scripts ensure a consistent and repeatable uninstallation process across multiple systems.
Steps for Automating Uninstall Process
| Step | Description |
|---|---|
| 1 | Create a script or batch file using a text editor like TextEdit or Terminal. |
| 2 | Include commands to remove Creative Cloud applications, preferences, and registry entries. |
| 3 | Test the script or batch file in a controlled environment before using it on production systems. |
| 4 | Schedule the script or batch file to run automatically or execute it manually as needed. |
Sample Script or Batch File
The following sample script can be used to uninstall Creative Cloud on Mac OS:
#!/bin/bash# Remove Creative Cloud applicationsrm
rf /Applications/Adobe\ Creative\ Cloud.app
rm
rf /Applications/Adobe\ Acrobat\ DC.app
rm
rf /Applications/Adobe\ Photoshop.app
# ... (continue listing all Creative Cloud applications)# Remove Creative Cloud preferencesrm
rf ~/Library/Preferences/Adobe
# Remove Creative Cloud registry entriesrm
rf /Library/Application\ Support/Adobe
# Clean up any remaining files or foldersfind /
- name "Adobe*"
- print0 | xargs
- 0 rm
- rf
Customizing the Script or Batch File
The sample script can be customized to meet specific requirements, such as removing additional Creative Cloud components or handling specific error conditions.
Optimize Mac OS After Uninstall

After uninstalling Creative Cloud, optimizing your Mac OS can improve overall system performance and stability. Removing residual files and folders, cleaning up disk space, and resetting system settings can help streamline your Mac’s operation.
Clean Up Residual Files and Folders
Residual files and folders can accumulate over time, taking up disk space and potentially affecting system performance. To remove these, manually search for and delete any remaining Creative Cloud-related files and folders in the following locations:
- Applications folder
- Library folder
- Preferences folder
- Application Support folder
- Caches folder
- Logs folder
Prevent Creative Cloud Reinstallation

To prevent Creative Cloud from automatically reinstalling on a Mac OS computer, you can disable automatic updates and remove Creative Cloud from the list of installed applications.
Disable Automatic Updates
- Open the Creative Cloud desktop application.
- Click the gear icon in the upper-right corner and select “Preferences.”
- In the “Updates” tab, uncheck the box next to “Automatically update Creative Cloud apps.”
Remove Creative Cloud from Installed Applications
- Open the “Applications” folder on your Mac.
- Find the “Adobe Creative Cloud” folder and drag it to the Trash.
- Empty the Trash to permanently remove Creative Cloud.
Potential Consequences
Preventing Creative Cloud from reinstalling can have some potential consequences:* You will not receive automatic updates for Creative Cloud applications.
- You may not be able to install new Creative Cloud applications or updates.
- Some features that rely on Creative Cloud services may not work properly.
Steps to Prevent Creative Cloud Reinstallation
| Step | Action ||—|—|| 1 | Disable automatic updates in Creative Cloud preferences. || 2 | Remove the Creative Cloud folder from the Applications folder. || 3 | Empty the Trash to permanently remove Creative Cloud. |
Troubleshooting Tips
If you encounter issues preventing Creative Cloud from reinstalling, try the following troubleshooting tips:* Restart your Mac.
- Make sure you have administrator privileges.
- Check if any Creative Cloud processes are still running in Activity Monitor.
- Uninstall any third-party applications that may be interfering with the uninstallation process.
- Contact Adobe Support for assistance.
Best Practices for Uninstalling Creative Cloud

To ensure a successful uninstallation of Creative Cloud on Mac OS, it’s essential to follow best practices. Here’s a comprehensive checklist to guide you through the process:
Checklist for Uninstalling Creative Cloud
- Close all Adobe applications before initiating the uninstallation.
- Download the Creative Cloud Cleaner Tool from Adobe’s website.
- Run the Creative Cloud Cleaner Tool and select the option to remove all Creative Cloud files, including applications, preferences, and caches.
- Manually delete any remaining Creative Cloud folders or files from your Mac’s hard drive.
- Reset your Mac’s PRAM and SMC to clear any residual settings.
- Restart your Mac to complete the uninstallation process.
Common Mistakes to Avoid
- Uninstalling Creative Cloud applications without using the Creative Cloud Cleaner Tool can leave behind residual files and folders.
- Forgetting to reset your Mac’s PRAM and SMC can prevent the complete removal of Creative Cloud settings.
- Reinstalling Creative Cloud before completely uninstalling the previous version can lead to conflicts and errors.
Troubleshooting Tips
- If the Creative Cloud Cleaner Tool encounters any issues, manually delete the remaining Creative Cloud files and folders using Finder.
- If you experience any persistent issues after uninstalling Creative Cloud, contact Adobe Support for assistance.
- To prevent accidental reinstallation of Creative Cloud, disable automatic updates in your Mac’s System Preferences.
FAQ Guide
How do I completely remove Creative Cloud from my Mac?
Follow the steps Artikeld in this guide to remove all Creative Cloud files, folders, and registry entries.
What should I do if I encounter errors during the uninstallation process?
Refer to the Troubleshooting section of this guide for solutions to common errors and issues.
Can I reinstall Creative Cloud after uninstalling it?
Yes, you can reinstall Creative Cloud by downloading the latest version from Adobe’s website.
