Creative wood slice projects – Embark on a creative journey with wood slice projects, where the rustic charm of nature meets endless possibilities. Discover how these versatile slices can transform into stunning wall art, personalized coasters, festive ornaments, and much more, as we delve into the enchanting world of wood slice artistry.
Introduction

Wood slices are a versatile and beautiful material that can be used in a wide variety of creative projects. They can be used to make everything from coasters and wall art to jewelry and furniture. Wood slices are also a great way to add a touch of nature to your home.
There are many different types of wood slices available, each with its own unique look and feel. Some of the most popular types of wood slices include:
- Pine:Pine is a softwood that is easy to work with and has a light, airy look. It is a good choice for projects that require a lot of detail.
- Oak:Oak is a hardwood that is strong and durable. It has a rich, warm color and a beautiful grain pattern. Oak is a good choice for projects that will be used outdoors or that will receive a lot of wear and tear.
- Birch:Birch is a hardwood that is known for its smooth, white bark. It is a good choice for projects that require a clean, modern look.
- Walnut:Walnut is a hardwood that has a dark, rich color and a beautiful grain pattern. It is a good choice for projects that require a luxurious look.
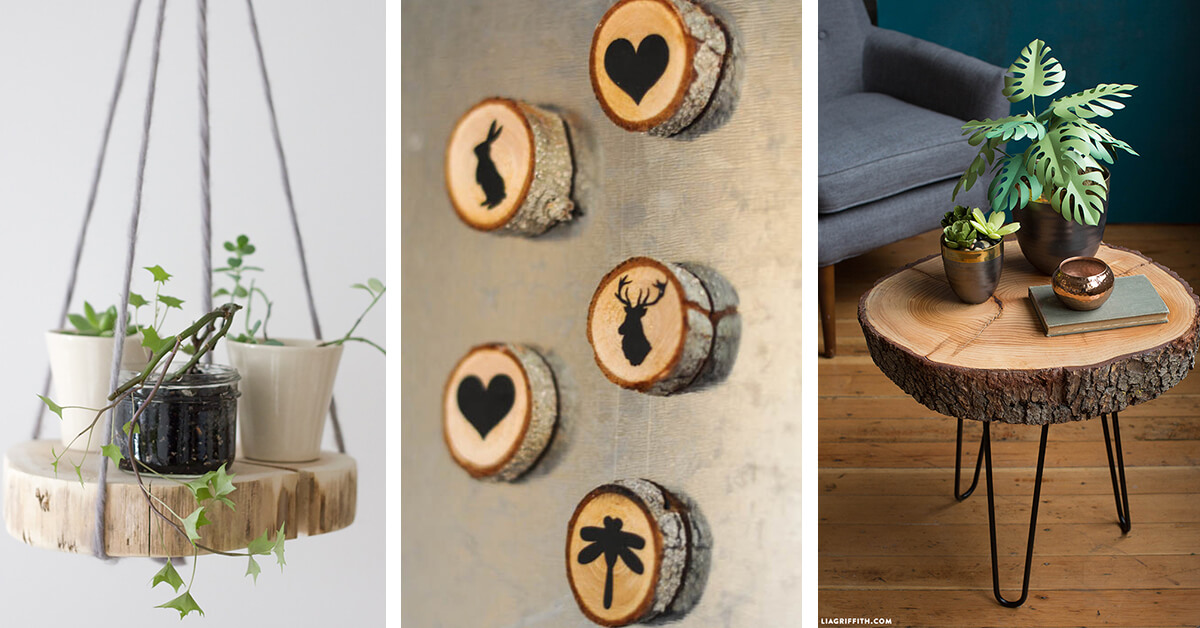
Decorative Wall Art
Wood slices are a versatile and beautiful material that can be used to create unique and eye-catching wall art. They can be arranged in a variety of ways to create geometric patterns, nature-inspired designs, or abstract compositions. Wood slices can also be painted or embellished to add a personal touch.
The type of wood slice you use will depend on the look you want to achieve. Thicker slices will create a more rustic look, while thinner slices will create a more delicate look. You can also choose from a variety of shapes and sizes, including circles, squares, and rectangles.
Once you have chosen your wood slices, you will need to prepare them for mounting. This involves sanding the slices to smooth any rough edges and cleaning them to remove any dirt or debris.
There are a variety of ways to mount wood slices on the wall. You can use permanent methods, such as nails or screws, or temporary methods, such as adhesive strips or Velcro. The method you choose will depend on the weight of the wood slices and the surface you are mounting them to.
Once you have mounted your wood slices, you can add any embellishments you like. This could include paint, stain, glitter, or even fabric. You can also use wood slices to create three-dimensional wall art by layering them on top of each other.
Materials and Tools
To create wood slice wall art, you will need the following materials and tools:
- Wood slices
- Sandpaper
- Paint or stain (optional)
- Embellishments (optional)
- Mounting hardware
- Tools (such as a hammer, nails, or screws)
Steps
The following steps will help you create wood slice wall art:
- Gather your materials and tools.
- Prepare the wood slices by sanding and cleaning them.
- Paint or embellish the wood slices (optional).
- Arrange the wood slices on the wall.
- Mount the wood slices to the wall.
Personalized Coasters
Transform ordinary wood slices into unique and personalized coasters that add a touch of rustic charm to your home decor. Whether you prefer the natural beauty of wood or want to add your own creative flair, creating custom coasters is a fun and easy project that anyone can enjoy.
Before you begin, gather your materials: wood slices, sandpaper, wood burning tool or paint, paintbrushes, embellishments (optional), and a clear protective finish.
Decorating Coasters
Once your wood slices are sanded smooth, it’s time to unleash your creativity. Here are some popular techniques for decorating coasters:
- Wood Burning:Use a wood burning tool to create intricate designs, patterns, or words on the surface of the wood slice. This technique is perfect for adding a personalized touch to your coasters.
- Painting:Apply paint to the wood slice using a paintbrush or sponge. You can use a single color or create colorful patterns and designs. Acrylic paints are a good option for coasters, as they dry quickly and are durable.
- Embellishments:Add embellishments such as beads, sequins, or fabric scraps to your coasters for a unique and eye-catching look. Use glue or decoupage medium to attach the embellishments securely.
Decoupage Techniques
Decoupage is a fun and easy way to decorate coasters with images or patterns from paper or fabric. Here’s a step-by-step guide to creating a personalized coaster using decoupage:
- Choose a paper or fabric with the desired image or pattern.
- Cut out the image or pattern and apply a thin layer of decoupage medium to the back.
- Place the image or pattern on the wood slice and smooth out any wrinkles or bubbles.
- Apply another layer of decoupage medium over the image or pattern and allow it to dry completely.
- Sand the edges of the coaster lightly to smooth any rough edges.
- Apply a clear protective finish to the coaster to enhance its durability.
- Paint snowflakes in white or silver on a blue background for a wintery touch.
- Create a reindeer silhouette by painting a black reindeer on a white background.
- Paint Christmas trees in green with red and gold embellishments.
- Use geometric patterns such as stripes, polka dots, or chevrons for a modern twist.
- Incorporate natural elements such as pine needles, acorns, or berries for a rustic look.
- Drill two small holes near the top of a wood slice.
- Insert jump rings into the holes and attach earring hooks.
- Add beads or charms to the jump rings for extra flair.
- Drill a hole through the center of a wood slice.
- Thread a leather cord or chain through the hole.
- Add a clasp to secure the necklace.
- Cut a thin strip of leather or fabric long enough to fit around your wrist.
- Attach a wood slice to the center of the strip with glue or rivets.
- Wrap the strip around your wrist and secure it with a button or snap.
- Wood slices
- Wood glue
- A backing board
- A frame (optional)
- Use a variety of different colors, shapes, and sizes of wood slices to create a unique and eye-catching mosaic.
- Experiment with different arrangements to find the perfect design for your space.
- Use a strong wood glue to ensure that the wood slices stay in place.
- Allow the glue to dry completely before framing the mosaic.
- Relief Carving:Creates raised or recessed designs on the surface of the wood slice.
- Intaglio Carving:Involves carving into the wood slice to create depth and texture.
- Chip Carving:Uses small knives to remove thin slivers of wood, creating intricate patterns and designs.
- Wood slice
- Pencil
- Carving knife
- Sandpaper
- Finish (optional)
- Draw the desired design onto the wood slice.
- Start carving by removing material around the edges of the design.
- Gradually refine the carving, adding details and shaping the wood slice.
- Sand the sculpture to smooth out any rough edges.
- Apply a finish (e.g., oil or varnish) to protect the wood and enhance its appearance.
- Sealing:Use a penetrating sealer to protect the wood from within.
- Finishing:Apply a finish such as oil, varnish, or polyurethane to create a protective barrier on the surface.
- Keep it clean by wiping it down with a damp cloth.
- Avoid exposing it to direct sunlight or extreme temperatures.
- Reapply sealant as needed to protect it from moisture and wear.
Protective Finish
To protect your personalized coasters from moisture and wear, apply a clear protective finish. Polyurethane is a popular choice for coasters, as it provides a durable and water-resistant coating. Apply several thin coats of polyurethane, allowing each coat to dry completely before applying the next.
Once the final coat is dry, your coasters are ready to use and enjoy.
Ornaments and Holiday Decorations
Wood slices can be transformed into charming ornaments and festive holiday decorations that add a touch of rustic elegance to your home. These versatile pieces can be painted, stained, or embellished to create unique and eye-catching seasonal accents.
To create wood slice ornaments, start by selecting wood slices of varying sizes and thicknesses. Sand the surfaces to smooth any rough edges. Paint the wood slices with acrylic paint in your desired colors or apply a wood stain for a more natural look.
Painting Techniques
For a festive touch, paint seasonal motifs such as snowflakes, reindeer, or Christmas trees on the wood slices. Use a fine-tipped brush for intricate details and a larger brush for broader strokes. Alternatively, you can use stencils or stamps to create precise patterns.
Embellishments
Add embellishments to enhance the ornaments, such as glitter, sequins, beads, or small bells. Glue them securely to the painted surface using a craft glue. You can also wrap the ornaments with twine or ribbon for a rustic touch.
Hanging Methods
To hang the ornaments, drill a small hole near the top of each wood slice and insert a ribbon, twine, or ornament hook. You can also use a strong adhesive to attach the ornaments to a wall or window.
| Item | Description |
|---|---|
| Wood slices | Various sizes and thicknesses |
| Acrylic paint | Seasonal colors or natural wood stain |
| Brushes | Fine-tipped and larger sizes |
| Embellishments | Glitter, sequins, beads, bells, twine |
| Craft glue | For securing embellishments |
| Drill | For creating hanging holes |
| Ribbon, twine, or ornament hooks | For hanging the ornaments |
Ideas for Painting or Embellishing
Jewelry and Accessories
Wood slices offer a unique and versatile material for creating one-of-a-kind jewelry pieces. Their natural beauty and organic shapes add a touch of rustic charm to any outfit.
With a little creativity and some basic tools, you can transform wood slices into earrings, necklaces, and bracelets. Embellish them with beads, wire, or other materials to create truly personalized accessories.
Earrings, Creative wood slice projects
Necklaces
Bracelets
To protect your wood slice jewelry from moisture and wear, seal it with a clear varnish or polyurethane.
Want to add a touch of nature to your home’s entrance? Try incorporating creative wood slice projects into your entryway décor. From rustic welcome signs to decorative wall hangings, there are endless ways to use wood slices to create a warm and inviting space.
And for even more inspiration, check out these creative entryways that feature wood slice accents.
Home Decor Accents
Wood slices can bring a touch of rustic charm to any home decor. They can be used to create a variety of decorative accents, from candle holders to picture frames. Here are a few ideas to get you started:
Candle Holders
Wood slices make beautiful and unique candle holders. Simply drill a hole in the center of the slice, insert a candle, and light it up. You can also add a touch of personality by painting or staining the wood slice or adding embellishments like beads or twine.
Picture Frames
Wood slices can also be used to create rustic picture frames. Simply glue or nail the wood slice to the back of a piece of glass or acrylic. Then, add your photo and secure it in place with a piece of tape or wire.
Kitchen and Dining Accessories

Wood slices can add a touch of rustic charm and functionality to your kitchen and dining area. With their natural beauty and durability, wood slices can be transformed into a variety of practical and stylish accessories.
Cutting Boards
Cutting boards made from wood slices are both functional and decorative. Choose a thick slice of hardwood, such as oak or maple, for durability. Sand the surface smooth and seal it with a food-safe finish, such as mineral oil or beeswax.
You can also add a handle or feet to make it easier to use.
Serving Trays
Wood slice serving trays are perfect for serving appetizers, drinks, or desserts. Choose a larger slice of wood and sand it smooth. You can leave the natural bark edge for a rustic look or trim it for a more finished appearance.
Seal the tray with a clear finish to protect it from spills.
Trivets
Wood slice trivets protect your table or countertop from hot pots and pans. Choose a thick slice of heat-resistant wood, such as walnut or cherry. Sand the surface smooth and seal it with a heat-resistant finish. You can also add feet to the bottom of the trivet to prevent it from slipping.
Tabletop Games

Wood slices can add a rustic and natural touch to your favorite tabletop games. Use them as game pieces, playing surfaces, or even custom game boards.
Custom Board Games
Create one-of-a-kind board games by drawing or painting your own designs on wood slices. You can also use wood slices as tiles or game pieces, adding a unique and personalized touch to your games.
Coasters and Game Accessories
Protect your table from spills and scratches with wood slice coasters. You can also use wood slices to create custom dice towers, card holders, and other game accessories.
Educational and Sensory Activities
Wood slices provide a natural and tactile element to educational and sensory activities, fostering creativity, cognitive development, and fine motor skills. The organic shapes and textures engage children’s senses, making learning experiences more engaging and memorable.
Incorporating wood slices into educational activities offers numerous benefits. They can be used as counting tools, helping children develop number recognition and counting abilities. They can also be used in puzzles, encouraging problem-solving and spatial reasoning. Additionally, wood slices can be painted or decorated to create personalized learning aids, fostering creativity and self-expression.
Counting Games
Wood slices can be used to create simple counting games that are both educational and entertaining. For instance, you can write numbers on wood slices and have children count them in ascending or descending order. You can also hide wood slices around the room and have children search for them, counting as they find them.
Puzzles
Wood slices can be used to create puzzles that challenge children’s problem-solving abilities. For example, you can cut wood slices into different shapes and have children fit them together to create a larger shape or picture. You can also use wood slices to create mazes or other puzzles that require children to use spatial reasoning and logical thinking.
Outdoor Decor: Creative Wood Slice Projects
Wood slices can bring a touch of rustic charm to your outdoor space. They are a versatile material that can be used to create a variety of unique and charming decorations.
Before using wood slices outdoors, it is important to treat them to protect them from the elements. You can do this by applying a sealant or stain to the wood. This will help to prevent the wood from rotting or fading.
Garden Signs
Wood slices make great garden signs. You can use them to mark different plants or areas of your garden. To make a garden sign, simply write or paint your desired message on a wood slice. You can then hang the sign from a tree branch or fence post.
Planters
Wood slices can also be used to make planters. This is a great way to add a touch of rustic charm to your outdoor space. To make a planter, simply hollow out a wood slice and fill it with soil.
You can then plant your favorite flowers or herbs in the planter.
Other Outdoor Decorations
In addition to garden signs and planters, there are many other ways to use wood slices for outdoor decor. You can use them to make wind chimes, birdhouses, or even stepping stones. The possibilities are endless!
Wood Slice Mosaics
Wood slice mosaics are a beautiful and unique way to add a touch of nature to your home. They are relatively easy to make, and you can customize them to fit any style or decor. To create a wood slice mosaic, you will need:
Start by cutting your wood slices to the desired size and shape. You can use a variety of different colors, shapes, and sizes to create a unique and eye-catching mosaic. Once you have cut your wood slices, arrange them on the backing board in the desired pattern.
Once you are satisfied with the arrangement, glue the wood slices to the backing board. Allow the glue to dry completely before framing the mosaic.
Tips for Creating Wood Slice Mosaics
Wood Slice Sculptures
Wood slice sculptures offer a unique and creative way to transform ordinary wood slices into captivating works of art. These sculptures can range from abstract shapes to intricate animal figures, adding a touch of nature and creativity to any space.
Choosing the Right Wood
The type of wood used for wood slice sculptures significantly impacts the final outcome. Some woods, such as basswood or butternut, are softer and easier to carve, making them suitable for beginners. Harder woods like oak or maple provide greater durability and intricate details but require more effort to work with.
| Wood Type | Characteristics |
|---|---|
| Basswood | Soft, easy to carve, light color |
| Butternut | Soft, easy to carve, slightly darker than basswood |
| Oak | Hard, durable, rich brown color |
| Maple | Hard, durable, light-colored with a fine grain |
Carving and Sculpting Techniques
Carving wood slices involves using various tools and techniques to shape and refine the wood. Gouges, chisels, and knives are commonly used for removing material, while rasps and files are employed for smoothing and detailing.
Step-by-Step Guide to Creating a Simple Wood Slice Sculpture
Materials:
Instructions:
Preserving Wood Slice Sculptures
To ensure the longevity and beauty of wood slice sculptures, it is crucial to seal and finish them properly. This involves applying a protective layer that prevents moisture damage, UV exposure, and wear and tear.
Gallery of Wood Slice Sculpture Examples
Abstract Sculpture:Intricate geometric patterns carved into a wood slice, creating a dynamic and visually striking piece.
Animal Figure:A detailed carving of a bear’s head, capturing the animal’s spirit and personality.
Decorative Piece:A wood slice with a carved mandala design, adding a touch of bohemian charm to any space.
Wood Slice Furniture
Wood slices offer a unique and rustic charm to furniture making. They can be used to create tables, chairs, benches, and other pieces with a natural and organic aesthetic.
Preparing Wood Slices for Furniture Making
To prepare wood slices for furniture making, they need to be cut to the desired size and shape, sanded to remove any rough edges, and sealed to protect them from moisture and wear.
Joining and Assembling Wood Slices
There are several methods for joining and assembling wood slices for furniture making, including:
Glue and Dowels
This method involves using wood glue and dowels to connect the wood slices.
Screws and Bolts
Screws and bolts can be used to securely fasten wood slices together.
Mortise and Tenon
This traditional woodworking technique involves creating mortises (holes) in one wood slice and tenons (protrusions) on another wood slice, which are then fitted together.
Choosing the Right Type of Wood
The type of wood used for wood slice furniture will affect its durability, appearance, and cost. Some popular choices for wood slice furniture include:
Oak
Oak is a strong and durable wood that is resistant to rot and decay.
Maple
Maple is a hard and dense wood that is known for its beautiful grain pattern.
Pine
Pine is a softwood that is easy to work with and is available in a variety of colors.
Maintaining Wood Slice Furniture
To maintain wood slice furniture, it is important to:
FAQ Corner
What are some unique ideas for wood slice wall art?
Create geometric patterns, nature-inspired designs, abstract compositions, or even personalized messages by arranging and embellishing wood slices on a canvas or wall.
How can I make custom coasters from wood slices?
Sand and clean the wood slices, then decorate them with wood burning, paint, or other embellishments. Apply a protective finish to enhance their durability.
What types of wood slices are best suited for carving and sculpting?
Hardwoods like oak, maple, and walnut are ideal for carving due to their strength and grain patterns. Softwoods like pine and cedar are easier to carve but may require more support.
